DIY Garden: Dresser drawer raised beds
We were out walking the dog a couple months back during bulk trash pick-up days in our nabe and we discovered a few streets over someone was getting rid of a wooden dresser. We didn’t need a defunct dresser, but the drawers were solid wood, possibly oak. At that point we hadn’t figured out if we were going to be able to buy a house right away or if we needed to rent for a while, so a compact, potentially portable garden scenario was precisely what appeared before me on trash day. Pre-assembled garden beds!
Read on to reclaim roadside trash for your own contained garden:
1. Mel Bartholomew’s book, Square Foot Gardening is an essential resource to check out from the library, borrow from a friend or buy for your own. His website is chock full of interesting things, too. In his book, he details how to set up a larger square-foot garden proper, plants that do well in this shallow environment, and loads of other helpful growing tips that will apply to your dresser drawer scenario. My garden store even carries his kits and features an organic square-foot gardening soil mix, pre-madeI mostly stuck to his method, though I didn’t end up with his prescribed soil mix. And I don’t do the top grid. I’m not planning on blaming him for results I get based on my necessary improvisations (or aesthetic preferences). I’m just saying it’s flexible, and you should know that he developed his method based on many years of trial and error.
2. If you’re growing food, untreated (real) wood is a must, no particleboard. Standard variety paints and sealants have all sorts of nasty chemicals that I presume you don’t want diffused into your soil, plant roots and leafy greens. If you found sturdy drawers that have been treated, then head to the hardware or garden store and buy some sort of for-this-purpose liner that won’t allow those things to leach into your soil. Ask the store rep for suggestions on material.
Remove any drawer-function hardware, like this:
If your drawers don’t feel very sturdy and you think you might like to use these DIY garden beds for more than one growing season, consider fortifying the structure with metal corner brackets. You can make a sturdy frame that won’t explode after successive seasons of watering and sunlight with about $5 worth of hardware.
2. Dust off your drill because you’re going to need some drainage (if you don’t want to just pop the bottom of the drawer out completely). I used my biggest drill bit, the 1/4” one. There’s no one right way to do drainage, so drill away. I opted for this format based on Mel’s recommendation for his square-foot garden structures. My drawers are roughly four square-feet.
3. Position your ‘beds’ where you want them since moving them is feasible, though not desirable. Once you water, they get heavy!
Cover the bottoms with a layer of rocks to help out in the drainage/non-compacting department.
4. For best results use an (organic) potting soil mix. The key to growing food in shallow beds is keeping the soil light and fluffy so root systems can spread easily. A regular garden mix will be too dense for your drawers. That said, I bought garden mix in bulk at my fave garden store on the planet for $4 per 10-gallon bag and lightened it up with a super-light seed starting soil mix. Do as your budget allows.
When I mix my own soils, I always add special things like worm poop and mycorrhizal fungi fertilizer. The way I see it, my soil microbes need all the help they can get since I rarely follow the rules when it comes to gardening. When the plants are thriving and producing I fertilize once a week. Mel says you don’t need to fertilize ever, but that’s only if you follow his prescribed soil mix method.
5. Plant your seeds, or starts. Spacing will depend entirely on what you’re growing. The seed packet info is generally written for people who have real space to garden; consult Mel for the best advice on spacing/thinning seeds in your small-plot system.
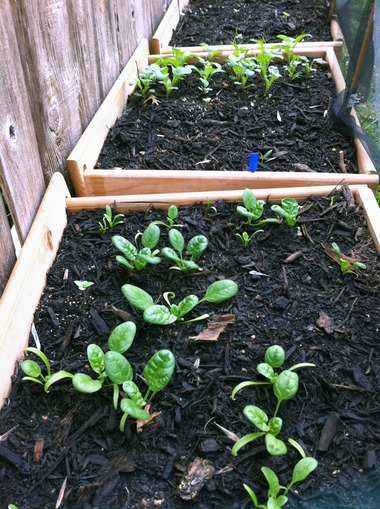
I’m growing lettuce, arugula, spinach, basil and strawberries in my dresser drawer garden beds. This was the seed spacing for my spinach ‘bed’.

6. Mulch! Once you’ve got what you want where you want it, find a straw or as-light-weight-as-possible mulch to cover your topsoil. If you’re using a wood mixture mulch, don’t lay it on too thickly or else it could smoosh down your light fluffy soil. This will help keep moisture in during peak sun hours and makes for a fine enclosed atmosphere for your soil bacteria.
(This is my first year to actually use mulch, which goes to show you that growing stuff and nature in general works when you don’t follow all the suggestions to a ‘T’, though my soil quality is the best yet and I’m wondering why exactly it’s taken me so long to follow such an easy suggestion.)
7. Water daily and proceed with life as usual, eating things as they pop up.
 Budget Living,
  Garden & Outdoors,
  Gardening,
  Reusing


Reader Comments (11)
your ideas are inspiring! i'm wondering if you have any crafty ideas for a compost? I am in my second year and my first compost bin was too exposed and awkward to stir the compost. budget is a factor. thanks for sharing your ideas! i like the pictures too, very impressive results with a thrown out dresser.
ooh I did exactly this about 3 summers ago! So far I've grown tomatoes, courgettes, tomatillos, spaghetti squash, and spring onions in my drawers! Though the only problem with untreated wood is that they do have a limited lifespan. This year is definitely going to be the last for my drawers, as they're really starting to go silver, peel, and rot.
I've got some photos up of my floating deck garden (I live on a boat by Tower Bridge in London) over here.
What am amazing idea. We grow our own vegetables every year (and cannot wait for the cold and snow to disappear so we can tackle the garden again), but what I love what what you did is that it is PERFECT for what I have been wanting to do with herbs. Thanks for sharing, and btw... loving your site!
Hi! I'm new here (followed your link from Marissa at Food in Jars) and I *love* your site!
We just (and I mean just) moved into the first apartment we've ever lived in that has a yard, and I am *itching* to get a garden going. I was thinking of doing raised beds, but that felt awfully permanent for renting, so your suggestion is perfect! I'm excited to hit up a local thrift/junk store to see what I can find in the way of wooden bureau drawers.
Congratulations on your book - it looks beautiful and I see I will have to get myself a copy :-)
Oh man, I love this idea.
This is great!! I'm trying to get the motivation to do this - don't have any drawer's yet - although I do have this dresser from IKEA that I so want to destroy soon!!! So disappointing cuz I love IKEA and this thing is maybe only 2 years old... :/
Anyway! I second the shout out for compost tips!! My worms are currently UNDER my compost bucket at the moment, they fell out of our drain holes - or intentionally crawled out. LOL - can you say, duh! What were we thinking making them so big!! Actually, I'm sharing responsibility even tho I was thinking about the concern as I saw them being drilled in... I was (wise) and kept my mouth shut! ;) I think next time I will try harder to "borrow" the drill. :)
Thanks again - LOVE your blog!
I was wondering what I would do with all the seedlings I started. I have a small yard in the city. I have the recommended Square Foot Gardening Book and love your drawer gardens. As I am getting rid of a dresser and will do this Question whether possible to remove bottom of drawer and just use sides of drawer. Thanks!
I read this the other day and thought, "Wow! That's a great idea. Too bad I don't have any old dresser drawers." I had read Mel's book this winter, but have been slow in building my boxes.
Then, on my way to work today, I spotted a pile of dresser drawers along side the road. I was running late, but I couldn't pass them up. So, I turned around and snagged the two that would fit in the backseat of the car.
When I talked to my husband from work and confessed that I picked up someone's trash, I learned that he also build a box for me from bricks. Yay! Now, I have one 4x4 foot garden box and two 2x2 boxes waiting for me to plant.
LOVE this idea!
Oh my! I can't wait to try this method. My husband and I share a giant porch patio, and our potted garden just doesn't have enough room. Thank you for sharing this idea.
Kate C
We can use it as a spray and drive them out of our backyard.